If your pallet count, carton count, weight, or reference numbers are off, Amazon can refuse the truck. In most cases, LTL, FTL, and container freight need an appointment booked 24 to 96 hours ahead, and drivers should plan to arrive about 30 minutes early.
Here’s the short version of what I’d focus on:
- I create the shipment plan in Seller Central first
- I lock the exact carton count, pallet count, dimensions, and weight
- I collect every ID the carrier needs, like the FBA Shipment ID, BOL, PRO, and trailer or container number
- I send one clean booking file to the carrier
- I check the confirmed date, time window, FC code, and load details before the truck leaves
- If timing changes, I reschedule early instead of waiting
This process is simple on paper: plan the load, match the data, book the slot, and deliver on time. But the margin for error is small. Even a minor mismatch can lead to redelivery fees, detention costs, and stock delays.
Quick comparison:
| Shipment type | Needs appointment? | Main point |
|---|---|---|
| Small Parcel (SPD) | No | Uses parcel carrier network |
| LTL | Yes | Carrier or forwarder books dock time |
| FTL / Container | Yes | Carrier or forwarder books dock time |
I see the article as a step-by-step guide to one core rule: Amazon receiving runs on exact shipment data. If the numbers and references match from booking to delivery, the load has a much better shot at getting checked in without trouble.
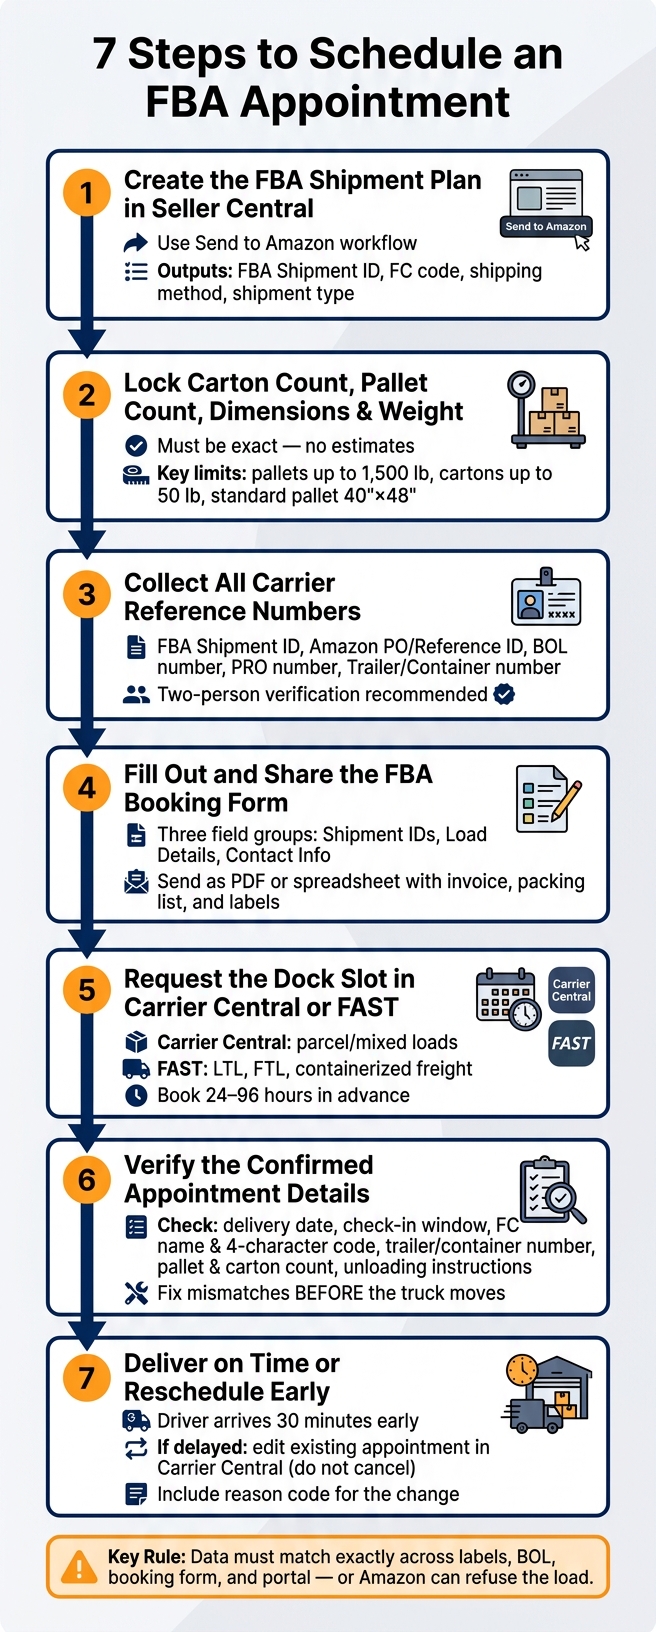
7 Steps to Schedule an FBA Appointment: A Visual Checklist
Steps 1 and 2: Build the Shipment Plan and Lock In Carton and Pallet Data
Step 1: Create the FBA Shipment Plan in Seller Central
Use Amazon’s Send to Amazon workflow in Seller Central to build the shipment plan. Pick your SKUs from Manage Inventory, enter the ship-from address, choose the pack type – individual or case-packed – and confirm the quantity for each SKU.
This workflow creates the booking details your carrier will need:
- FBA Shipment ID
- Destination fulfillment center (FC) code and full U.S. address (such as LAX9)
- Shipping method, which is usually LTL or FTL for truck deliveries
- Shipment type for the U.S. inbound leg: palletized or floor-loaded
Once the shipment plan is set, check the packed freight against it.
Step 2: Confirm Carton Count, Pallet Count, Dimensions, and Weight
At this stage, the physical load needs to match the shipment plan. No guesswork.
Before a carrier can request a dock slot, these details need to be final, not estimated:
| Detail | Requirement |
|---|---|
| Total carton count | Exact number of cartons on the truck |
| Units per carton | Per SKU, matching the shipment plan |
| Total pallet count | Confirmed after pallets are built |
| Pallet dimensions | Length × width × height in inches; standard U.S. pallets are 40" × 48" |
| Pallet weight | In pounds; keep within Amazon’s inbound limits, typically up to 1,500 lb per pallet |
| Total shipment weight | In pounds; cartons generally should not exceed 50 lb |
For China-origin shipments, lock these numbers only after the cargo has been physically received and palletized at the U.S. warehouse. Factory packing plans from China can help at the start, but they aren’t the final word. Production changes or QC rework can shift carton counts. Use warehouse-confirmed data, not factory estimates.
With carton and pallet data locked, the next move is getting the carrier reference numbers needed for booking.
Palletized vs. Floor-Loaded Freight
The load type you declare in Step 1 has a direct effect on scheduling. Palletized freight is simpler to unload and tends to book with fewer issues. Floor-loaded freight means loose cartons are stacked without pallets. That setup takes hand-unloading, adds more risk of damage from shifting in transit, and usually needs a longer appointment window.
If the load is floor-loaded, declare Load Type: Floor Loaded in Carrier Central and set pallet count to 0.
| Load Type | Unloading Ease | Damage Risk | Documentation Needs |
|---|---|---|---|
| Palletized | High (forklift-ready) | Low (securely wrapped) | Pallet labels on 4 sides |
| Floor-Loaded | Low (manual labor) | Higher (shifting risk) | Carton labels on every box |
sbb-itb-f9a91f9
Steps 3 Through 5: Gather Reference Numbers, Fill Out the Booking Form, and Request the Appointment
Step 3: Collect All Reference Numbers the Carrier Needs
Once the load is locked, gather every reference the carrier will need to enter. That includes the FBA Shipment ID, Amazon PO/reference ID, BOL number, PRO number, and trailer/container number.
These details need to match exactly across your box labels, the BOL, the booking form, and the portal entry. No extra spaces. No missing digits. No small mismatch that turns into a big delay.
A simple way to avoid errors is to split the task between two people:
- One person compiles all IDs
- Another person checks them line by line
It also helps to keep a shared document for each shipment and update it any time equipment or routing changes. That way, everyone is working from the same set of numbers.
Step 4: Fill Out and Share the FBA Booking Form
The master booking file is the document the carrier uses to enter the shipment into Amazon’s portal. To keep it clean and easy to review, group the fields into three sets:
- Shipment IDs: Seller name, destination FC code and full address, FBA Shipment ID, and Amazon PO or reference ID
- Load details: Pallet and carton counts, dimensions and weight per pallet in inches and pounds, load type, carrier SCAC code, and trailer or container number
- Contact info: A U.S. phone number and email reachable during the FC’s business hours, plus any handling notes such as non-stackable pallets or a required live-unload window (often managed by an Amazon FBA prep service)
Send the completed form as a PDF or spreadsheet with the commercial invoice, packing list, and labels. Add a short cover note that says who owns the booking, the preferred delivery window, and any restock deadline.
For example:
Preferred delivery: 09/15/2026, 10:00 AM–2:00 PM local time. Must be delivered no later than 09/20/2026 due to restock limits.
That packet becomes the source file for the portal request.
Step 5: Request the Dock Slot in Carrier Central or FAST
Using the booking form, the carrier submits the appointment request in Carrier Central or FAST.
| Aspect | Carrier Central | FAST |
|---|---|---|
| Who typically books | Parcel carriers and some integrated carriers | Freight carriers, LTL/TL providers, and forwarders |
| Common load type | Small parcel or mixed shipments | Full truckload, LTL, and containerized freight |
| Key required fields | Carrier account, destination FC, shipment IDs, delivery window | FBA Shipment ID, FC code, pallet/carton counts, weight, equipment details, SCAC |
The carrier enters the FC, shipment IDs, counts, weight, load type, requested window, trailer or container number, and SCAC.
Steps 6 and 7: Confirm the Appointment and Complete Delivery
Step 6: Check the Confirmed Date, Time Window, and Load Details
Once the request is submitted, check the returned slot before the truck moves. After the carrier sends the request, compare the confirmation line by line against the booking form before dispatch.
Make sure the confirmed pallet count, carton count, and load details match the booking form.
Verify these fields:
- Delivery date in U.S. format (for example, 09/15/2026)
- Check-in window in the facility’s local time
- Destination FC name and 4-character code (for example, ONT8, LAX9, FTW1)
- Trailer or container number
- Pallet count and carton count
- Unloading instructions, including live unload or lumper requirements
If anything in the confirmation is off, fix it before the truck leaves. A small mismatch here can turn into a missed delivery later.
Step 7: Deliver on Time and Reschedule Early If Plans Change
With the slot confirmed, delivery day comes down to timing.
On delivery day, the driver should arrive 30 minutes early for gate processing. If the driver shows up late, the appointment may be marked as a no-show after the grace period tied to that slot.
At check-in, the driver should have the appointment confirmation, BOL, and matching references ready. Keep the POD for your records.
Delays happen. Traffic backs up, trailers run late, and schedules slip. When that happens, don’t sit on it. Reschedule as soon as the delay appears. Edit the existing appointment in Carrier Central instead of canceling and booking a new one, and include a reason code or comment that explains the change.
Early notice gives you a better shot at getting a new slot close to the original date and helps protect inventory availability.
How to Schedule FBA Delivery to Amazon and Use Carrier Central
Conclusion: 7-Step Checklist for a Confirmed FBA Appointment
Once the slot is confirmed, execution matters more than planning. At that point, the job is simple in theory and unforgiving in practice: move freight from the shipment plan to the dock in a checked, repeatable sequence.
The big thing to get right is data accuracy. If the data doesn’t match, Amazon can delay check-in, refuse the load, or add extra fees. That’s where a lot of shipments go sideways.
For Amazon FBA shipping from China, FCLGO can coordinate pickup, FBA prep, customs clearance, warehousing, trucking, and delivery to Amazon fulfillment centers. Just as important, accurate data and early rescheduling help keep the dock slot in place and inventory moving.
FAQs
Who is responsible for booking the Amazon dock appointment?
You’re responsible for scheduling the delivery appointment in the Carrier Appointment System in Seller Central.
That said, if you use FCLGO as your freight forwarder, it can take care of the coordination for you. That includes trucking and appointment scheduling, so your shipment can get the dock slot it needs and avoid delays.
What happens if my shipment details change after the appointment is booked?
If your shipment details change after booking, you can run into check-in delays. Amazon expects the physical cargo and the paperwork to match the routing plan exactly.
If carton counts, weights, dimensions, or labels don’t line up, the shipment may be flagged or rejected. That can mean updating documents or booking a new delivery window.
Always make sure your shipping documents and labels match your current Seller Central shipment plan.
How far in advance should I schedule an FBA appointment?
Plan to schedule your FBA delivery appointment 2 to 3 weeks in advance to help secure an available slot at Amazon fulfillment centers.
Slots can fill up fast, especially during peak season. So it’s smart to book at least 14 days ahead to help avoid delays and leave room for final-mile variables.
发表回复